NuttX Quickstart
This quickstart guide is for using Jupiter Nano with NuttX, and assumes you are familiar with Apache NuttX :wand Internet networking. If not, please see installing.
Creating a Bootable Micro SD Card - NuttX
Download this disk image and burn it to your Micro SD card using Balena Etcher.
Jupiter Nano Apache NuttX image (12.0.0.-RC0)
Alternatively, format a Micro SD card with FAT, FAT32, or VFAT format, and copy the files in this archive to the Micro SD card:
Jupiter Nano Apache NuttX files (12.0.0.-RC0)
The nuttx.bin executable in the files above was made from the jupiter-nano:sdmmcnsh configuration.
This includes SDMMC and CDC-ECM Ethernet over USB drivers, and the NSH command line shell.
Connecting to Jupiter Nano
Jupiter Nano has been tested on macOS and Linux. If you have problems, please contact the Jupiter Nano mailing list.
Install the Micro SD Card.
Plug in the Micro USB cable to the Jupiter Nano Console port.
- Start a serial terminal:
$ picocom --imap lfcrlf -b 115200 /dev/ttyACM0
(Or use whatever device your serial terminal is on your machine.)
You should see the system booting (click the image to enlarge it):
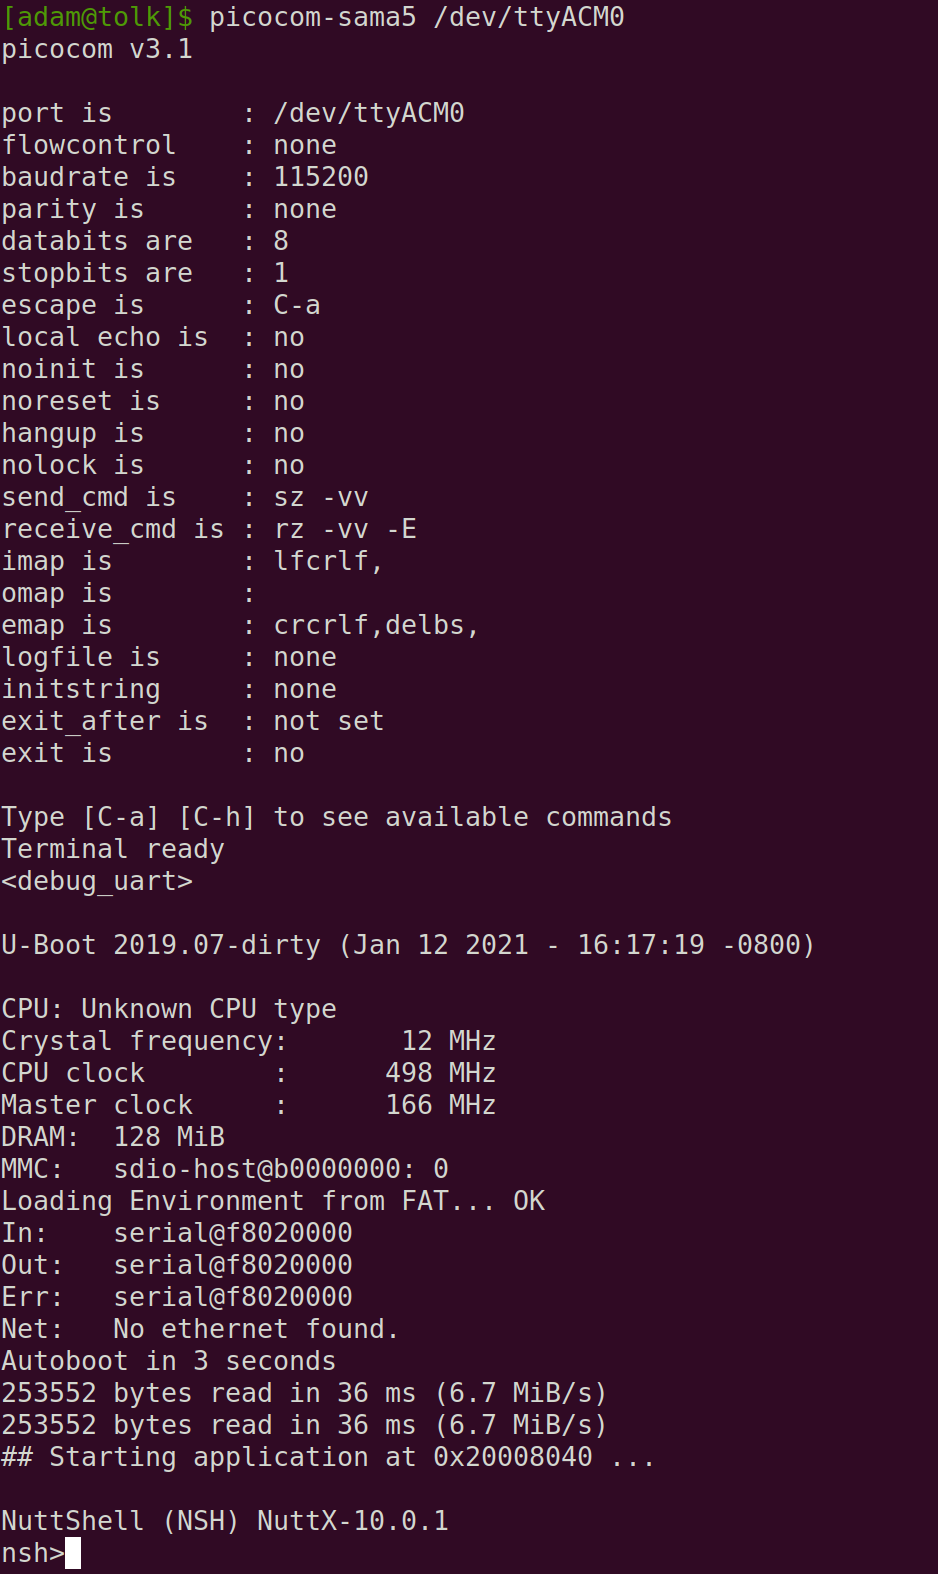
NuttX shell
You should see something like this (here we’re running
helpto see all the nsh commands, and thenifconfig: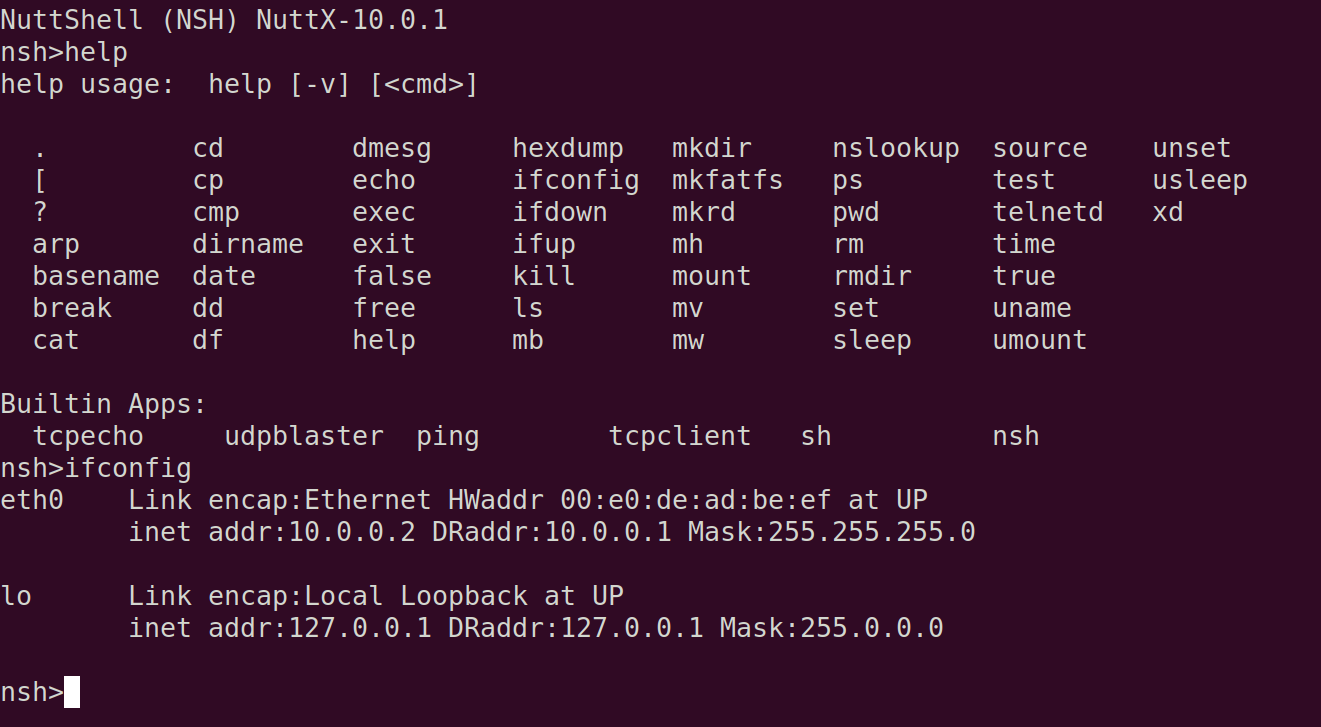
Networking Using Ethernet over USB on NuttX
These instructions have only been tested on Linux. On macOS and Windows you will need to do something similar to what is in the netusb.sh script. If you get a script running for these platforms, please contribute it to the Jupiter Nano Tools repository via a pull request!
Plug a Micro USB cable to the Jupiter Nano Native port (keep the Console cable plugged in).
NuttX will boot, the blue status LED should be on steady and bright, and the network is brought up.
- Using the Jupiter Nano console session, let’s look at our devices and IP numbers:
nsh>ifconfig
eth0  Link encap:Ethernet HWaddr 00:e0:de:ad:be:ef at UP
    inet addr:10.0.0.2 DRaddr:10.0.0.1 Mask:255.255.255.0

lo    Link encap:Local Loopback at UP
    inet addr:127.0.0.1 DRaddr:127.0.0.1 Mask:255.0.0.0
On this version of NuttX,
eth0is a USB Ethernet Gadget interface, it automatically assigns a static IP number of10.0.0.2, and sets the default route to10.0.0.1. This is configurable when you compile NuttX, or you can build a configuration filesystem separately. More on this in another update.On your Linux workstation, let’s check out our network interfaces and see which one is the USB Ethernet Gadget:
$ cd jupiter-nano-tools
$ sudo ./scripts/netusb.sh show
enx020000112233: flags=4163<UP,BROADCAST,RUNNING,MULTICAST>  mtu 1486
        inet 10.0.0.1  netmask 255.0.0.0  broadcast 10.255.255.255
        ether 02:00:00:11:22:33  txqueuelen 1000  (Ethernet)
        RX packets 55  bytes 3164 (3.1 KB)
        RX errors 0  dropped 0  overruns 0  frame 0
        TX packets 957  bytes 108787 (108.7 KB)
        TX errors 0  dropped 0 overruns 0  carrier 0  collisions 0
On my Ubuntu 20.04 Linux computer, the USB Ethernet Gadget interface is
enx020000112233. Yours will probably have a name; if you want to verify manually, you can doifconfig -a, unplug the Native USB cable, and doifconfig -aagain. The USB Ethernet Gadget interface will be the one that disappears.On your Linux workstation again, set up the network there (replace
wlp0s20f3with the name of the network interface that you use to connect to the Internet):$ cd jupiter-nano-tools $ sudo ./scripts/netusb.sh wlp0s20f3 enx020000112233 on $ sudo ./scripts/netusb.sh wlp0s20f3 enx020000112233 on default via 192.168.1.1 dev wlp0s20f3 proto dhcp metric 600 169.254.0.0/16 dev br-cc496150b4da scope link metric 1000 linkdown 172.17.0.0/16 dev docker0 proto kernel scope link src 172.17.0.1 linkdown 172.18.0.0/16 dev br-cc496150b4da proto kernel scope link src 172.18.0.1 linkdown 192.168.1.0/24 dev wlp0s20f3 proto kernel scope link src 192.168.1.209 metric 600 enx020000112233: flags=4163<UP,BROADCAST,RUNNING,MULTICAST> mtu 1486 inet 10.0.0.1 netmask 255.0.0.0 broadcast 10.255.255.255 ether 02:00:00:11:22:33 txqueuelen 1000 (Ethernet) RX packets 55 bytes 3164 (3.1 KB) RX errors 0 dropped 0 overruns 0 frame 0 TX packets 969 bytes 111151 (111.1 KB) TX errors 0 dropped 0 overruns 0 carrier 0 collisions 0 default via 192.168.1.1 dev wlp0s20f3 proto dhcp metric 600 default via 192.168.1.209 dev enx020000112233 proto static metric 20100 10.0.0.0/24 dev enx020000112233 scope link src 10.0.0.1 10.0.0.0/24 dev enx020000112233 proto kernel scope link src 10.0.0.1 metric 100 10.0.0.2 dev enx020000112233 scope link src 10.0.0.1 169.254.0.0/16 dev br-cc496150b4da scope link metric 1000 linkdown 172.17.0.0/16 dev docker0 proto kernel scope link src 172.17.0.1 linkdown 172.18.0.0/16 dev br-cc496150b4da proto kernel scope link src 172.18.0.1 linkdown 192.168.1.0/24 dev wlp0s20f3 proto kernel scope link src 192.168.1.209 metric 600 192.168.1.209 dev enx020000112233 proto static scope link metric 20100 PING 10.0.0.2 (10.0.0.2) 56(84) bytes of data. 64 bytes from 10.0.0.2: icmp_seq=1 ttl=64 time=0.164 ms --- 10.0.0.2 ping statistics --- 1 packets transmitted, 1 received, 0% packet loss, time 0ms rtt min/avg/max/mdev = 0.164/0.164/0.164/0.000 ms
This brings up the
usb0USB Ethernet Gadget interface on your local machine, gives it the IP address of10.0.0.1, and sets up routing from10.0.0.2to the Internet.- Then on the Linux workstation you can do:
$ ping -c 1 10.0.0.2
PING 10.0.0.2 (10.0.0.2) 56(84) bytes of data.
64 bytes from 10.0.0.2: icmp_seq=1 ttl=64 time=0.155 ms

--- 10.0.0.2 ping statistics ---
1 packets transmitted, 1 received, 0% packet loss, time 0ms
rtt min/avg/max/mdev = 0.155/0.155/0.155/0.000 ms
$ telnet 10.0.0.2
Trying 10.0.0.2...
Connected to 10.0.0.2.
Escape character is '^]'.

NuttShell (NSH) NuttX-10.0.1
nsh>
- On the Jupiter Nano console or telnet session, you should be able to do the following:
$ ping 10.0.0.2
nsh> ping -c 1 10.0.0.1
PING 10.0.0.1 56 bytes of data
56 bytes from 10.0.0.1: icmp_seq=0 time=0 ms
1 packets transmitted, 1 received, 0% packet loss, time 1010 ms
$ ping 8.8.8.8
nsh> ping -c 1 8.8.8.8
PING 8.8.8.8 56 bytes of data
56 bytes from 8.8.8.8: icmp_seq=0 time=20 ms
1 packets transmitted, 1 received, 0% packet loss, time 1010 ms